
Table of Contents:
Connecting the Service in QGIS
Connecting the Service in Autodesk Civil 3D
Connecting the Service in Bentley OpenRoads
Connecting the Service in Global Mapper
Connecting the Service in ArcGIS
Introduction
The SkySnap portal provides site data, including orthophotos, through a standard WMS web service. This allows you to work with always up-to-date data from the portal directly in GIS software — the layer is fetched from the server in real time, so after each data update in the portal, you see the latest version without the need to download and replace files.
The instructions below show how to connect the service in incl. QGIS. Because WMS is an open standard, you can also use the same service address in other GIS/CAD applications that support WMS.
Requirements and Permissions
To display data correctly through the WMS service, you must have a SkySnap portal account with access to the relevant site — when connecting the service, you will use the same credentials that you use to log in to the portal.
NOTE: Minimum role — Viewer, in the context of the data you want to display.
IMPORTANT: If you do not have access to the site in the portal, the WMS layer will not load in QGIS, even if the service address is correct.
WMS Service Address
General format of the WMS link for a site:
where XX is the site number — you can find it in the browser address bar while viewing the relevant site in the portal.
Example — if the project address in the portal is https://app.skysnap.com/site/17/46/, the WMS service link for that site is https://app.skysnap.com/wms/site/17
Connecting the Service
Connecting the Service in QGIS
Step 1. Create a new WMS connection
In the Browser panel, right-click the WMS/WMTS item and select New Connection… (alternatively: Layer menu → Add Layer → Add WMS/WMTS Layer…).

In the connection window, enter:
-
any Name, e.g. “SkySnap – site name”,
-
in the URL field, paste the service link, e.g. https://app.skysnap.com/wms/site/17.
Confirm by clicking OK.
Step 2. Configure authentication
In the authentication section, create a new authentication configuration and complete the following:
- Name: any configuration name in QGIS
- Make sure the Basic authentication option is selected
- User name: your SkySnap portal user name
- Password: your SkySnap portal password
Confirm by clicking OK.
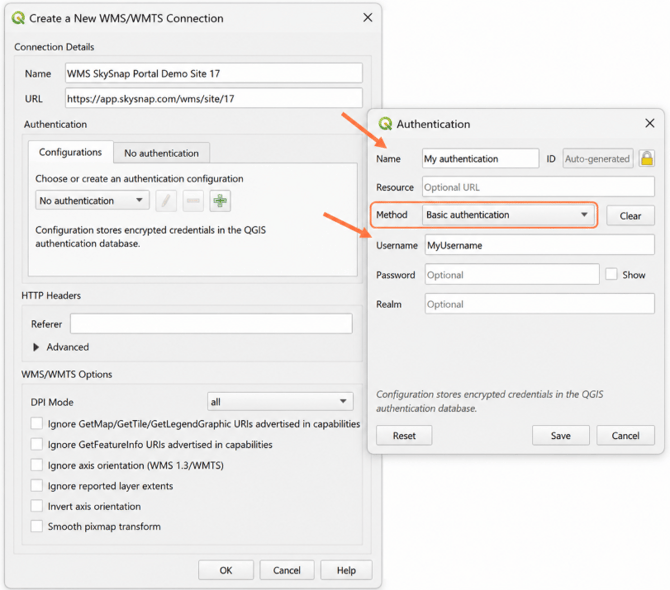
NOTE: The user name and password are the same credentials you use to log in to the SkySnap portal. QGIS will remember the configuration, so you do not need to enter them again for future connections.
Step 3. Connect and add the layer to the map
Click Connect. After successful authentication, a list of all orthophotos uploaded to the portal for the selected site will appear, grouped by date (projects).
Select the layer you want (for example, an orthophoto from a specific flight) and click Add. The layer will appear in the map window and in the Layers panel.
IMPORTANT: The project coordinate system in QGIS must match the coordinate system of the site in the portal; otherwise, the layer may be displayed in the wrong location.
Connecting the Service in Autodesk Civil 3D
Step 1. Set the project coordinate system
Autodesk Civil 3D requires the project to have a coordinate system that matches the coordinate system of the site in the SkySnap portal. Set it before adding the WMS connection.
IMPORTANT: Without the correct coordinate system set, the WMS layer will be displayed in the wrong location or may not load at all.
Step 2. Create a new WMS connection
In the WMS service setup window, complete the following fields:
- Connection name — any connection name
- Server name or URL — the service link, e.g.
https://app.skysnap.com/wms/site/17 - Version — set to
1.1.1
Then enter your user name and password — the same credentials you use to log in to the SkySnap portal.

IMPORTANT: The service version must be set to 1.1.1. Other versions may not work correctly with Civil 3D.
Step 3. Add the layer to the map
After the connection is established, select the orthophoto you want from the list and click Add to Map.

Connecting the Service in Bentley OpenRoads
Step 1. Open the raster management window and select WMS
In the raster management window, select the WMS option.

Step 2. Enter the service URL and login credentials
Paste the WMS service link for your site, for example https://app.skysnap.com/wms/site/17, and then enter your SkySnap portal user name and password.

Step 3. Select the orthophoto and add it to the map
After successful authentication, a list of all orthophotos uploaded to the portal for the selected site will appear, grouped by date (projects). Expand the project you are interested in, select the orthophoto, and click Add to map.

Step 4. Save the configuration and attach the raster
Click Save and Attach, then save the configuration to a file.


Step 5. Re-enter the login credentials
In the Layers panel, right-click the attached layer and select Enter Credentials. Enter the same user name and password you use for the SkySnap portal, then click Attach.


Once complete, the raster from the SkySnap portal will appear in the OpenRoads application window.

Connecting the Service in Global Mapper
Step 1. Open the WMS source window
Open the WMS connection window, click Add New Source…, select WMS from the list, and confirm by clicking OK.

Step 2. Define the connection
Enter the WMS service URL for your site, for example https://app.skysnap.com/wms/site/17. Select the Prefer WMS 1.1.1 Over Newer Versions option.

Step 3. Authenticate and retrieve the list of layers
Click Get List of Available Data Layers. A login window will appear — enter your SkySnap portal credentials. After successful authentication, a list of available layers will be displayed. Confirm by clicking OK.

NOTE: Use your SkySnap portal user name and password to confirm that you have permission to view the WMS content.

Optionally, you can create a new category in which the WMS link will be saved.

Step 4. Add the orthophoto to the map
In the main WMS management window, select your connection, choose the orthophoto you want, and click Connect.

The data will appear on the map.

Connecting the Service in ArcGIS
Step 1. Create a new WMS connection
In ArcGIS, open the window for creating a new WMS connection.

Step 2. Define the connection parameters
Enter the WMS service URL, for example https://app.skysnap.com/wms/site/17, set the version to 1.1.1, and then enter your SkySnap portal login credentials to confirm that you are a user with access to the WMS data.

IMPORTANT: The service version must be set to 1.1.1. Other versions may not work correctly with ArcGIS.
Step 3. Select the layer
After the connection is established, a list of all orthophotos for the selected site will appear, grouped by projects. Select the layer you want and add it to the map.

Common Issues
Authentication error / layer does not load — check whether the login credentials you entered are correct (the same as for the portal) and whether you have access to the selected site (minimum role: Viewer). Also verify the site number in the service URL.
The image is displayed in the wrong location — set the project coordinate system in QGIS to match the coordinate system of the site in the portal.
Connection issues in other programs — in some programs (e.g. Civil 3D, Global Mapper, ArcGIS), you must additionally set the WMS service version to 1.1.1.
Data loads slowly — the WMS service renders the image on demand; work with a zoomed-in view of the area being analyzed.
Changes made in the portal are not visible after an update — clear the layer cache or reconnect to the service.