Table of Contents:
Creating annotations on a photo
Photos in the portal
Photos uploaded to a project can be found in the layers panel, in the Photos folder (Photos for standard photos and Photos 360 for panoramas). Once the layer is enabled, the photos are displayed on the map as markers at the locations where they were taken.
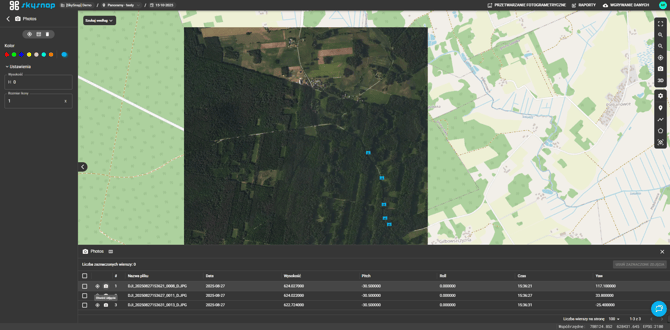
IMPORTANT: For both types of photos, the location (GPS georeference) must be saved in the metadata. Photos captured directly by a drone contain this data and can be uploaded without issue. Photos without metadata will not be accepted by the portal.
When you open the Photos layer, a panel appears where you can:
- select the color of the markers on the map,
- adjust Height (the height at which the markers are displayed) and Icon size in the Settings section,
- manage photos in bulk using the eye icon (visibility), table icon (open the photo table), and trash icon (delete).
Photo table and its functions
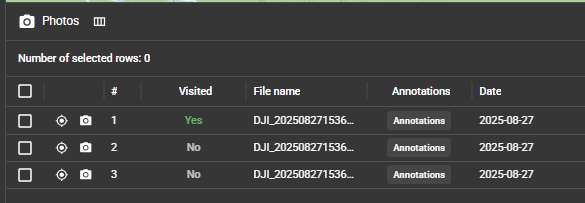
The table icon at the top of the Photos panel opens a table with all photos in the project. The table contains the following columns: File name, Date, Altitude, Pitch, Roll, Time, and Yaw - the full capture parameters for each photo.
Table functions:
- the target icon next to a row locates the photo on the map,
- the camera icon next to a row opens the photo in the viewer,
- checkboxes let you select rows; the number of selected items is shown above the table,
- Delete selected photos removes multiple photos at once,
- Rows per page controls pagination at the bottom of the table.
You can also choose which columns are visible in the table. The columns icon at the top opens the Visible columns menu with a list of all available columns, where you can select or clear the ones you want to display. The Reset columns to default button restores the default column layout.
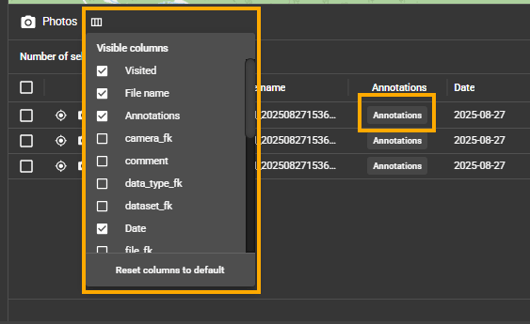

Clicking the Annotations button in a row of the photo table opens the Photo annotations panel with a list of all annotations added to that photo. At the same time, the photo is displayed on the map together with the marked areas.
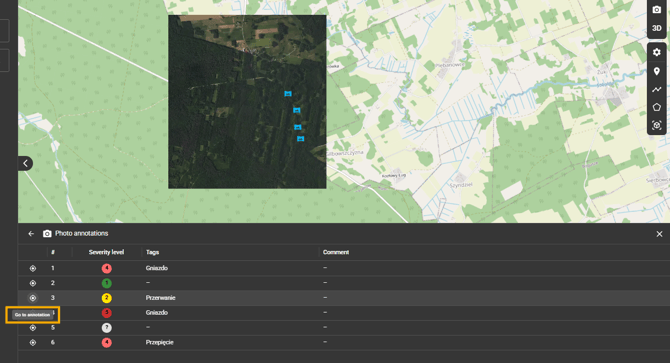
The panel contains the following columns:
- # — the annotation number,
- Severity level — the importance level on a scale from 1 to 5, marked with colors from green to red; a question mark means that no severity level has been assigned,
- Tags — labels assigned to the annotation (for example, “Nest,” “Break,” or “Surge”),
- Comment — an additional text note.
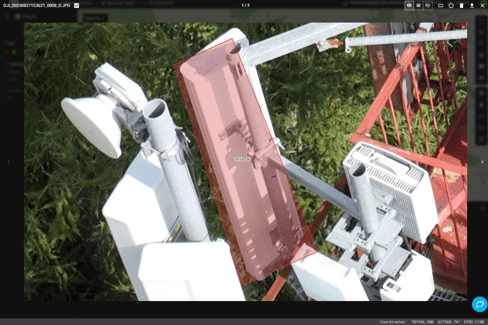
You can locate each item on the list using the target icon (Go to annotation). Clicking it zooms the photo directly to the selected annotation, allowing you to quickly move to a specific defect or observation.
Creating annotations on a photo
NOTE: Annotations are inspection tools. They let you review a photo and mark anything that requires attention, such as defects, damage, or specific infrastructure elements visible in the image.
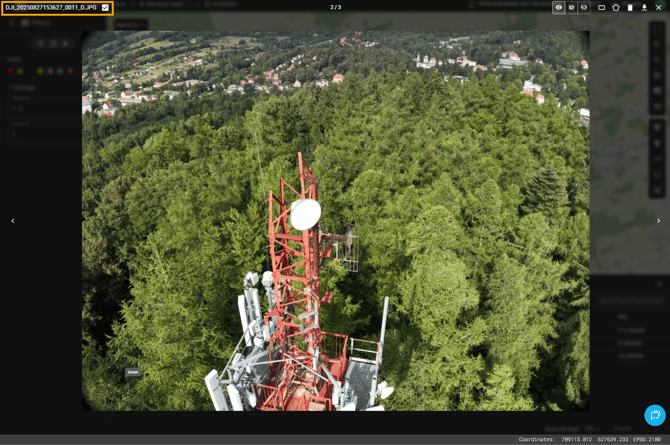
To add an annotation, first open a photo from the photo table by clicking the camera icon in the selected row. The photo will open in the full-screen viewer. You can move between photos using the arrows, and their numbering (for example, 1/3) is shown at the top.
In the toolbar in the top-right corner, you will find the following tools:

- Add annotation (rectangle) and Add annotation (polygon) — draw a marked area on the photo,
- eye icons — toggle annotation visibility on the photo,
- trash icon — delete,
- download arrow — download the photo.
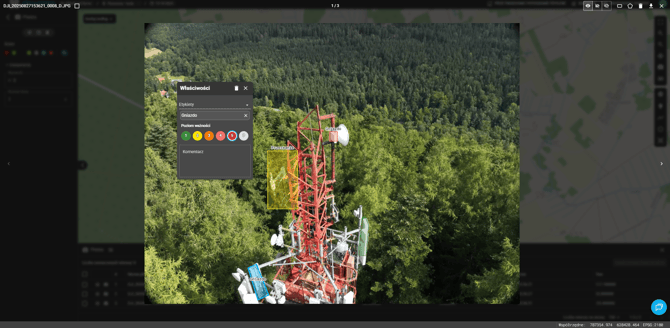
Choose either the rectangle or polygon tool and draw the shape on the photo where the defect or observation appears.
TIP: All markers added to photos are automatically saved and synchronized with the report.
Photos you have already reviewed can be marked as visited. In the top-left corner of the viewer, next to the file name, there is a checkbox for marking the photo as checked. You can also simply press the space bar while viewing the photo. Marked photos are visible in the photo table in the Visited column (Yes / No).
Tags
After drawing a shape, the Properties window opens, where you can describe the annotation:
- Tags — select or enter a label (for example, “Nest” or “Break”); the label is displayed next to the annotation on the photo,
- Severity level — a 1–5 scale marked with colors from green to red,
- Comment — an additional text description.
You can delete an annotation using the trash icon in the Properties window.
TIP: You can also share an annotation added to a photo with another user. To do so, click the icon located to the left of the trash icon. A link to the annotation will be copied to your clipboard. Opening the link will display the photo zoomed in on the selected annotation.
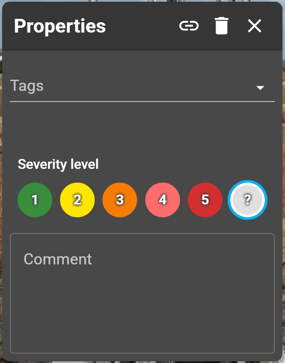
Instead of choosing a tag from the default list, you can enter the name of a new tag and click the plus icon. The new tag will appear on the list and will be available across the entire site. Tags work per site: each site receives the same default set of labels.
IMPORTANT: Tags within a site can be managed by an administrator. They can delete default labels and create custom ones, which will then be available to all users within that site — across every photo and project in that site.
Filtering and management
The photo table includes an Annotations column that groups all marked items. Photos are displayed on the project map as markers in the assigned color — you can change this color in the Color section at the top of the panel.
In the Annotations column, you can:
- quickly filter created annotations using the Severity level list (All, Undefined, 1, 2, 3, 4, 5) and the Tags list (All, No tag, and tags assigned to the site),
- go to a specific annotation — each item on the list (for example, a specific .JPG file number) is interactive, and clicking it takes you directly to the photo with the marked defect,
- manage the visibility of points on the main project map in bulk using the trash icon at the top of the panel (simply delete photos).
Photos 360
Photos 360 are spherical panoramas used for visualization and environmental preview. You can find them in the layers panel in a separate Photos 360 folder.
IMPORTANT: The portal does not generate 360 photos from standard photos. You must upload a ready-made, valid 360 photo. The portal maps it onto a sphere, allowing you to rotate the view and inspect the scene in all directions.
You open a 360 photo in the same way as a standard one: from the map marker or from the photo table. In panorama view, you move around the sphere by clicking and dragging, which lets you look around freely.
IMPORTANT: Photos 360 are for viewing only and are not used for inspections. This means that annotation creation tools are not available for them. These functions apply only to standard photos in the Photos folder.
Annotations in reports
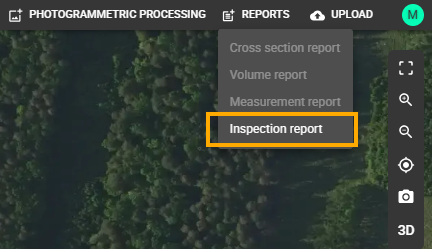
Annotations added to photos can be collected in an inspection report. You generate the report in the same way as other reports in the portal: from the top menu, select Reports → Inspection report.
Before generating the report, you decide which annotations will be included. You can choose a single annotation, several selected annotations, or all of them, and narrow the scope by filtering by severity levels and tags.
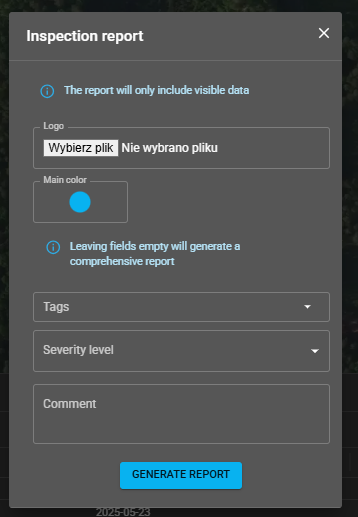
The finished report is sent by email in PDF format.
The PDF inspection report consists of the following parts:
- a title page with basic information: Location (site/project), Coordinate system, Created at, and Reported by,
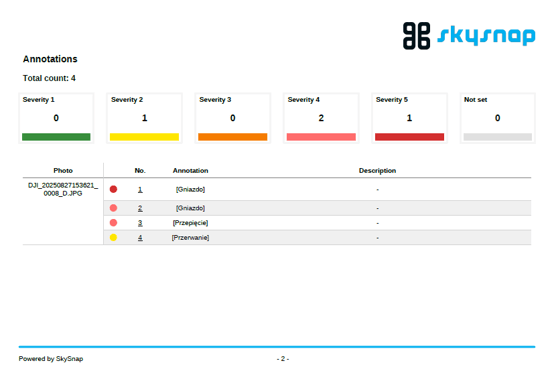
- an annotation summary with the total number of items (Total count) and a breakdown by severity levels: Severity 1–5 and Not set,
- a summary table with the following columns: Photo (file name), No. (annotation number), Annotation (tag), and Description,
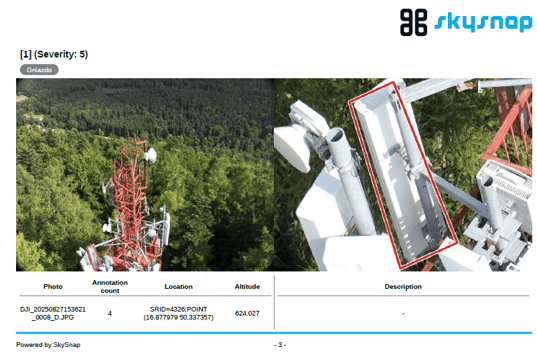
- a separate page for each annotation with the photo, the highlighted defect area, and the following data: Photo, Annotation count (number of annotations on the photo), Location (coordinates), Altitude, and Description.